Friday, December 27, 2019

3ds max Spline Modeling Revolving a surface with the Lathe modifier

3ds max Spline Modeling Revolving a surface with the Lathe modifier


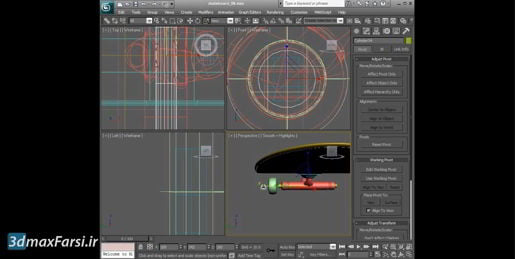
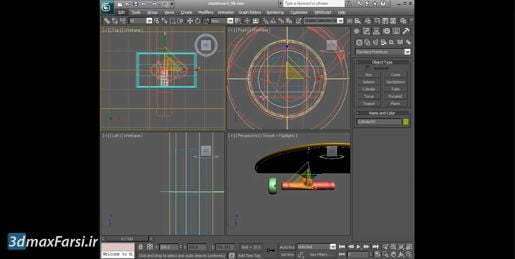
3ds max Spline Modeling Revolving a surface with the Lathe modifier And we can isolate that if we want. We can choose Isolate Selection and orbit around and check the shape. And once again, we can go back down into the Line, Sub-Object Modes and with Show End Result turned on, we can make any final adjustments to the shape of that lathed object. When you're finished, don't forget to exit out of Sub-Object Mode, and also exit out of Isolate Selection. And then we can just position this wherever we need it, rotate it, orient it so that it's oriented according to the slope of this monitor itself. Tumble around in the perspective view to make sure it's positioned where we want. And if we want to make the cord itself join up to that, then we can just select that cord, go into Vertex, Sub-Object Mode, and we can move those points around. And it looks like I've got a gray object here that's not showing up very well against the gray background. So I'll just exit out of Sub-Object, select that cord plug object. Let's give it a name up here, we'll call it cord plug, and change up the color as well so that we can see it against that gray background. And then back at our actual cord, edit its shape in order to make it line up. And we can always go back into our lathe object, exit out of Sub-Object Mode, reselect the lathe, and then go back into Line, Vertex, Sub-Object Mode and once again adjust the shape. We can, in fact, move all them and make that little bit thicker so that it matches up better with that cord. All right, I'll exit out of Sub-Object Mode, and that is how to create a lathe or a surface of revolution.

3ds max Spline Modeling Setting shape detail with Interpolation

3ds max Spline Modeling Setting shape detail with Interpolation


3ds max Spline Modeling Setting shape detail with Interpolation it's going to change the level of detail. Well, in our case, the Adaptive option looks pretty good, and I'm not going to be animating this so maybe I'll leave that on. And I can exit out of vertex sub-object mode and dolly back, take a look at this, and maybe look in the other viewports. I'll minimize that view with ALT+W once again, tumble around, maybe getting closer. So that's how to control the level of detail for an editable spline object. And that detail will ripple forward into certain modifiers, but it will not necessarily ripple forward into, for example, the loft compound object. As we saw earlier, we can control the level of detail of a loft with its parameters. And the loft actually ignores these interpolation settings. But modifiers may actually respect those interpolation settings. Finally, if we want to convert this to an editable poly in order to bring it into a game engine or something, whatever values we see in the viewport is what we will get when we convert to an editable poly. So, we have Adaptive enabled right now, and if I convert this is editable poly, then I will be pretty much stuck with those typology choices and it'll be hard for me to change the level of detail. So just make sure you have exactly what you want displayed in the viewport before you convert an editable spline to a polygon object. That's how to control interpolation for an editable spline.

3ds max Spline Modeling Rendering shapes

 3ds max Spline Modeling Rendering shapes


3ds max Spline Modeling Rendering shapes Unless we turn on this additional switch that says use view port settings, and if that's turned on, then we have two different sets of settings. We have the renderer settings and the view port settings. And we may want to for example, make the view port have fewer sides and that would optimize the view port and make it run faster, better performance. But I don't actually recommend doing this 'cause it gets really confusing. So let's not use the view port settings, and we'll have a what you see is what you get situation where these settings are used for both the renderer and the view port. I'll set the thickness down to

3ds max Spline Modeling Editing Bezier splines

3ds max Spline Modeling Editing Bezier splines


3ds max Spline Modeling Editing Bezier splines  Right click on that and enable the axis constraints toolbar and here it is and this tells us what our current access constraints are. We're currently constrained to Y, so I can choose X or Y over here and now finally I can drag that Bezier handle in any direction in the space here of the front view port. Right so axis constraints are kind of important, so I'll actually just park those up there. I've got my UI locked so I'll go to customize and unlock it and drag and drop that up into the main toolbar and then re-enable lock UI layout. This is very helpful, and there are keyboard shortcuts for that if you want to use them. F5 is X, F6 is Y, F7 is Z and F8 will switch between the three axes of XY, YZ and ZX. So each time you press F8 you'll cycle between those three. Alright so finally I just want to move this last point so that it's positioned where I want it to be near the monitor and then I can re-enable the transform gizmo because we'll need that later. So Ctrl + Shift + X to re-enable it and then finally we can exit out of sub-object vertex by just clicking at the top level of editable spline and we've made some simple adjustments, and now we've got a nice curve there. Again there are a lot of tools in editable spline and we just barely scratched the surface. 

 3ds max Spline Modeling Editing Bezier splines Alright so we go into our front view over here and maybe play around with that too, give that some believable shape. Now you might run into an issue here where you're trying to extend a handle, let's say you're trying to drag this handle and you want to move it in the X and Y space of this front view port. But when you click on that you're only able to move it in Y and not in X and that's because of the transform gizmo kind of getting in the way here. So we can hide that move tool gizmo if we want and there's a keyboard shortcut for that which is Ctrl + Shift + X and that's kind of a secret. There is another command over here, show transform gizmo but that's a completely different command and that's actually not what we want. You can see that it's still enabled. So I'm pointing this out to you so that you'll know you don't want to use this, you need to use the Ctrl + Shift + X keyboard shortcut and that actually changes a preference in the customize preference menu. Okay so now we can see that we still have our axis tripod, and we can see that the Y axis is highlighted meaning that we can only move that tangent handle in Y. Now the next part of this is enabling the axis constraints toolbar so that we can change the axis. So go to any toolbar or panel, and find the textured bar at the top or side of it. 3ds max Spline Modeling Editing Bezier splines

3ds max Spline Modeling Editing control vertex types

3ds max Spline Modeling Editing control vertex types


3ds max Spline Modeling Editing control vertex types so I'm moving the entire curve. I can deselect all of the points and just select that one. So those are Bezier control verticies. There's a variant of that that has broken tangent handles that can be adjusted independently. When we move these tangent handles around they move together. But I can right-click once again and choose Bezier Corner, and now we can move each one independently with broken tangent handles. To reconnect them, I can right-click once again, and choose Bezier, and notice that they both snapped to being tangent to that line. So now, they're connected once again. And those are the four different vertex types, Smooth, Corner, Bezier, and Bezier Corner. I'm going to leave these all at the type of Bezier. And then I can exit out of Sub-Object Vertex Mode. That's how to convert a freehand spline. And also, how to convert various vertex types on an editable spline or line object.

3ds max Polygon Modeling Preparing Boolean operands

3ds max Spline Modeling Editing control vertex types


3ds max Polygon Modeling Preparing Boolean operands And so I can't tell where I need to cut, and there's a little trick for this, what you can do is select your object, and go into the object properties, right-click, choose object properties, and in here we can enable see-through for the object. And in my case, I am not inheriting the properties of the enclosing layer. If you see this is all grayed out, and it says by layer here, then you can click that by layer button and then get to these options for the current object. Okay, so click OK, and with see-through enabled now it's displayed in gray, and I can just barely see where the line on my image plane is. And that's where I want to create the box. Right, so I'll go into the create panel, to box, and I want to snap in 3D, to the existing grid points. Get in close there. Click and drag, holding down the left mouse button, and then simultaneously hold down the middle mouse button, and drag. And keep doing that, just release the middle mouse, and then drag, and then click the middle mouse again. But holding down the left mouse button the entire time. And then when we get over here to the other side, release the mouse, and drag, and you'll see in the create panel that the height is changing. It doesn't matter what the height is just now, we just click to complete the operation and that box has been built, and then right-click to exit creation mode. Go back to the perspective view with alt-w. And then zoom in with z, and there's our box, and we need it to be a lot taller, I want the door to be 200 centimeters in height, that's about six and a half feet. And with that object selected, the box, go into the modify panel, and I can set the height to 200 centimeters. And the width here doesn't really matter, because that's the thickness of the hole, so I can increase that, but as long as it is thicker than the object we're trying to cut, then everything is fine. But there is one little issue here at the bottom, we will have a coincident situation here, where the polygon of the cutting box is right on top of the polygon for the object we want to cut, which is the wall.

3ds max Modeling Versioning and collapsing the stack

3ds max Modeling Versioning and collapsing the stack


3ds max Modeling Versioning and collapsing the stack And collapse all will convert the entire modifier stack to an editable mesh. Okay, there's also the collapse to, you might've seen that. If I go to a lower modifier in the stack, such as taper, and right-click, I can choose collapse to. And what that will do is convert the current modifier and anything below it to an editable mesh, and it will preserve the modifiers above it. I'm not going to do either of those, because those convert to an editable mesh, which is not really what I want. There are two forms of polygon objects in 3ds Max. Editable mesh is the older, more antique version, and editable poly is the newer, much more advanced polygon object. If I want to make subsequent changes to this model, I'll want to convert to editable poly, and that's not available from the modifier stack itself. It is available from the quad menu.

3ds max Modeling Versioning and collapsing the stack Select an object, right-click anywhere in a viewport, and choose convert to, convert to editable poly. And now we no longer have a modifier stack, there's no box primitive, no taper, and no bend. Instead, we've converted it to the object type of editable poly, and we have a bunch of new tools available to us, but we can never get back to the parameters of the original modifiers, and that is why I saved this out to a new file name before performing that destructive conversion. And of course I would want to save this again, now that I've made the change. That's how to version a file before performing a destructive change such as collapsing the modifier stack, converting a parametric model to an editable poly. And that wraps up the chapter on parametric modeling with modifiers.