Friday, December 27, 2019

3ds max tutorials Scene Layout - Collecting objects in groups

3ds maxScene Layout - Collecting objects in groups


3ds max tutorials Scene Layout - Collecting objects in groups And now I can select an individual object. And I know it's an open group when I see these pink brackets or a pink bounding box around all the objects. And if I click on that pink bracket, I actually select the group. Even though the individual members of the group don't light up, they're not actually selected. But yet I can still transform them. I can still move them as a unit. I'll undo that with Control + Z. To close the group, simply go back into the menu and choose Close. If you want to destroy the group, you can go into the menu and choose Ungroup, and then the objects will no longer be subordinate to the group, and the group itself will be destroyed. Okay, that's how to use groups in the viewport. It also helps to create groups if you need to declutter the scene explorer or the outliner view. I previously hid the scene explorer, so let me bring it back from the main toolbar. Toggle scene explorer. And we see that we have columns group, and that is an invisible transform node.

3ds max 2020 tutorials Scene Layout - Duplicating objects with Array

3ds max 2020 tutorials Scene Layout - Duplicating objects with Array


3ds max 2020 tutorials Scene Layout - Duplicating objects with Array And I can roughly adjust that and then release the mouse, and it looks like it wants to be 600 centimeters. So that's what I'll type in here, 600. And press Tab. So that's in one dimension. We also want copies in the other dimension here. So under Array Dimensions, we'll choose 2D, and the total number we want is going to be three. So increase the count to a value of three. And then click and drag on the Y axis, and drag that down because we want to move in negative Y. And as I drag that down, notice that my cursor will wrap from the bottom to the top of the screen, so that's very handy. So I can position that roughly, and it, too, looks like it wants to be 600 centimeters. It's going to be negative 600. Type that in, and press Enter. And now it looks like we've got the situation we want, with those columns precisely positioned, each six meters away from the other.

And if we like what we see, we can go ahead and click the OK button. And now we have all these different columns. Now notice that when we select the column, its name is actually in bold up here. And that's because, by default, when you create an array, you create instances. So I can go back in there real quick, just to show you, if I select something and go back to Tools, Array, the default type of object is Instance, and that means all the objects are going to be identical. If you make changes to one, you change them all. So I'll cancel out of there. So if I select any one of these and change it's parameters, they will all be affected because they're instances. So change the height, and they all grow. All right, I'll undo that with Control + Z. That's how to use the Array tool to make duplicates in a spatial pattern.

3ds max 2020 tutorials Scene Layout - Creating an image plane

3ds max 2020 tutorials Scene Layout - Creating an image plane


3ds max 2020 tutorials Scene Layout - Creating an image plane Maximize the top view with Alt W and get in closer with the mouse wheel, and you'll see that it looks very fuzzy and very difficult to read. So you want to change up your display parameters in order to load the image in at its full resolution. And that's done from viewport configuration. Go to any viewport and click on the plus sign at the upper left in the viewport label menu. So click on the plus sign, go to configure viewports. And we have the display performance tab. And here you see texture maps. And that is the display of textures in the viewports. And it's set to 512 by default. Increase that up to 2,048. And now once we click apply, we can see that our image is much more legible. Okay, so I can set this back just to demonstrate. 512, press enter, and then click apply. And it goes back to a very grainy display. All right, I wouldn't push it any farther than 2,048 unless you've got really good graphics capabilities on your computer. While we're here, by the way, you can see that I have the anti-aliasing quality set up all the way. And this is just the generic anti-aliasing. What that does is soften up wireframes and things like that. So I'm going to set that to its highest value on my system. If you experience any issues with your computer then you might want to come back in here and set these to lower values once again. Click apply to close the viewport configuration dialogue. And that's how to set up an image plane. I'll mention just in passing that there is an alternate workflow for this using the background of a viewport, but I don't use that workflow because it's very difficult to control the size of the image. And so that's why I use an explicit plane primitive.

And so I've constructed this image very precisely so that the width of the canvas, if it were to be measured, would be 20 meters or 2,000 centimeters. And the floor plan within that is smaller. So this is just a gotcha. You have to be aware that in order to get your image plane scaled correctly, you need to account for the size of the canvas or the page and not just the size of the object. Okay, so now that we know that, I'm going to close this and then create a plane in the perspective view. Go to the create panel, and from the geometry section, standard primitives, click on the plane button. Go over to the perspective view, and click and drag to create that plane. Right-click to exit and then go into the modify panel. And rename it image plane. Let's set its parameters. You have the length and width. We'll set each of those to 2,000 centimeters. 2,000, type in a tab, and then the width, 2,000, and press enter. And center it on the world. Use the move tool, and give it an X and Y value of zero. And then we can dolly back in all views. I can use zoom extends all selected. Click on that button and now we can see our entire scene. We need to apply the image plane onto the surface. We'll learn a lot more about materials later. For now, we're just going to create a very basic material so we'll be able to see the image plane. Open up the material editor, and it's got a button on the main toolbar or you can invoke the keyboard shortcut, which is M. And we get this slate material editor. And then expand that window a little bit and make it bigger. And create a physical material. We can see it over here in materials, general, physical material. And this is the best choice for materials because it's compatible with almost all renderers and viewport technologies. So drag that over into the view here and we create a new physical material. Then double-click on the name or the label. And its parameters are loaded into the parameter editor. Let's change its name up here. It's got a name called material number something. We'll rename it and call it image plane, and press enter. Then we need to connect a bitmap. Down here we see basic parameters, base color and reflections. And it's got a color swatch. Next to that color swatch is a little button. This tiny little button here allows us to add a map to that color. So click on that button and we get another window coming up called the material map browser. And we see a bunch of maps listed. And near the top is maps, general, bitmap.

3ds max Saving a maxstart.max template scene


3ds max 2020 tutorials Scene Layout Saving max template scene if I right click on a magnet icon on the main toolbar and go to grid and snap settings, home grid, I've got a grid spacing of one centimeter. Okay? So I've got the scenes set up the way I want it to be every time I launch 3ds Max and in fact, if I wanted to, I can even change the view ports and change anything I want. I can even have objects in the scene and they will get stored in this maxstart dot max and every time I launch the program or reset it then we will see that object appear. But I'm not doing that in this case, I just want a simple template, so let's just save this as it is. We'll go to the file menu and choose save as, and within the current project's scenes folder, I want to give it the name of maxstart dot max. That's all it is, nothing fancy and click save.

3ds max Spline Modeling Modeling walls with the Extrude modifier

3ds max Spline Modeling Modeling walls with the Extrude modifier


3ds max Spline Modeling Modeling walls with the Extrude modifier At this stage, we're going to extrude up the walls, and then later we're going to come back in here and cut holes with a Boolean. So for now, we're just going to trace over the floor plan that I've loaded in. And if you have trouble visualizing this floor plan, if it looks fuzzy, go back and look at the movie earlier in the course that dealt specifically with creating the image plane and the material for the image plane. My scene is currently set to a working units of centimeters. And although the image plane is not really that accurate, we can actually snap to the grid and get very accurate results. So let's check in on the grid. Right-click on any of the magnet icons on the main toolbar to open the Grid and Snap Settings dialog. I'm snapping to grid points. Under Options, I am going to enable the axis constraints. And the home grid shows a grid spacing of one centimeter. I can close that and then enable 3D snaps. And now, if I use the Move tool, then you can see the cursor is snapping to grid points even though the grid is not being displayed in this top viewport. If I press the G key on the keyboard, I can see that grid, but it's kind of hard to see the grid and the image plane at the same time. So I'll turn the grid off with G. Let's just create a simple rectangle for this hallway wall. Go into the Create panel, to Shapes, Rectangle, and drag out to create that rectangle. And it may not be at the exact right location, but that's okay. The important thing is we're snapping to grid points. Right-click to exit, and then we can get in closer with the mouse wheel. Position that, and it looks like I got it pretty right the first time. But you might need to go into the Modify panel and check in on the dimensions. 

We do want a 10-centimeter thickness to these walls. And the width here, I've got a nice round number of 1800 centimeters. It does look like I've pretty much got it right the first time. Now that's kind of rare, but there you go. For the other wall over here, we can create another rectangle, but we'll probably need to get in closer and turn on the grid. So let's press the G key, enabling the grid display. Get in very close. We want to be able to get down to the level of individual centimeters because this one's a little bit trickier. It's not quite on round numbers or every 10 centimeters major grid lines. So that's going to be 10-centimeters wide, and we want to visualize the width while we're creating it. And we might not be able to do that if the Display Layers palette is opened, so let's turn that off. Go to the Create panel, and choose Rectangle. And we're snapping in 3D. Click and drag, and monitor that width as you do it. And we have the Width parameter down there, so let's make that 10 centimeters. And we can drag upward. And we want to go way upward, but of course we can't get that far. But here's the magic trick. Hold down the middle mouse button and the left mouse button at the same time. So I'm holding down the left mouse button at all times. 

And then when I want to move the view, I can use the middle mouse button, hold that down, or I can use the wheel. I can zoom out. So this is very helpful, middle mouse and wheel while holding down the left mouse button. Getting closer again, and we've got a 10-centimeter width and a length of 565 centimeters. Finally, release the left mouse button and right-click, and that rectangle has been created precisely. All right, cool. So we have one more here, which is this interior wall. It's L-shaped. I'll turn the grid back off again. And we can create this one with a standard line. Enable the Line tool. Get in a little bit closer. We don't have to be super precise because we can always change this later. Click to create a point. And we can zoom out, zoom back in again with the mouse wheel, click to create a point. And we're going to create a closed line. So just go all the way around. And then finally, when we get back to our original point, click on it, and we get a dialog, asking do we want to close the spline? And the answer is yes. Let's get back in really close, and then press the G key. And reposition those last two points that weren't quite right. Go to the Modify panel. Go into Vertex subobject mode. Select those points, and just position those. And exit out of the subobject mode.

3ds max Spline Modeling Creating a TextPlus primitive

3ds max Spline Modeling Creating a TextPlus primitive


3ds max Spline Modeling Creating a TextPlus primitive In the perspective view, I'll right-click so I don't lose my selection and also the press Z key. Maybe pick that up and move it above the ground plane in the perspective view. Press the Z key again. And as we tumble around or orbit in the perspective view, it looks kind of weird. We're seeing some flicking polygons known as Z-fighting because it's got an extrude depth of zero and the polygons in the front and back are crashing into each other. We'll address that in a moment, but first, let's just look at the basic text parameters. So in the Modify panel, scroll down. In the Geometry rollout, just temporarily disable Generate Geometry. And now, we just see the type outlines. And if you see brackets in a shaded view, that's a selection bracket. We can turn that off if we want with the J key and that'll just unclutter the view a little bit. Now, let's play around with the text parameters. So we can go into the fonts here and we can change the fonts on a per character basis. So maybe select all of the text in the window and change the font to Arial Black. And some of it's in italics and we change that if we want. We can select that type and disable the italic flag. And of course, we can also change the actual content here. 

3ds max Spline Modeling Creating a TextPlus primitive .Let's change up the text to KinetEco and then we can adjust some of the text parameters. Down here, we have global parameters. We have the size, tracking, which is of course the spacing between letters, leading, which is the spacing between baselines. We can also get a faux condensed or extended effect by adjusting the V scale and H scale. If we want to restore this to default parameters, we can just click Reset Parameters. And in this Reset Text window, we can enable various options to reset and then just click Reset. Now, let's turn on the geometry once again. Go back into the Geometry rollout and turn on Generate Geometry. And we've got the extrude depth here. If we click and drag, we can determine the thickness of the extrusion. And if you want, you can do a negative value so that the extrusion will go behind the pivot point. Let's set the extrude value to -5 centimeters. And so that we can see this better, let's get really close in the perspective view. Right-click the perspective view and use Alt-W to maximize the view and the keyboard shortcut F4 to turn on wireframe on shaded or edged faces. Getting close on one of these corners. And now, we can play around with the beveling. Turn on Apply Bevel and then we have some presets here. Says Custom, but let's play around, see what we have. We've got convex and that'll give us a nice rounded bevel on the front. If we look in the back, we actually won't see a bevel in the back just yet. If we need to see a bevel in the back, we can do that by turning on Show Advanced Parameters. you can also adjust the bevel push and that'll give you a little bit more artistic control there. I'm going to choose the preset of just a simple linear chamfer and that looks pretty good on both sides. We can fine tune the shape by adjusting the outline offset here. But be careful, because as you can see, if you take that too far out, you're going to have some issues. So be careful with these kind of parameters so that you don't end up with illegal geometry. I'll set the outline offset back to zero and maybe give it a little bit more bevel depth. So we have nice, thick letters there, but at this point now, some of the letters are actually crashing into one another, so I need to kern these. And this is where the real fun comes in. We can go back up into the parameters here and enable Manipulate Text. 

3ds max Spline Modeling Creating a TextPlus primitive .And then we can go and select the text object and you'll see there's some dots in the middle of each letter. And if I select one of those, I get a manipulator around it. And for this initial K, maybe I want to make it just simply larger than the rest of the letters and I can do that interactively. I don't need to bother with setting the size over here. It's just interactive, so just click on this corner and uniformly scale that K up. Let's look at this in the front view, Alt-W. I can do the same for the E. Select in the center there and click and drag to increase the size. And notice that the spacing between letters is preserved, so that's really a helpful feature. If I want to change the spacing or kerning, I can do that interactively as well. For example, I've got a little bit of crashing here between the K and the I. I can select the I and then click in the center again to drag left and right to set the kerning. And I can just do that throughout and set each letter individually. 

3ds max Spline Modeling Creating a TextPlus primitive . When we're finished with that, we can just go ahead and turn off Manipulate Text. Go back out to the perspective view with Alt-W and admire our work. If we wanted to deform this, it would be a little bit difficult because we don't really have a lot of detail. We would have to go in and actually make a lot of manual cuts to deform this well. The best that we can do actually is, in the Geometry section here, we have Cap Type and it's set to morph by default. And we can't really see any difference if we change this to Grid, but it's changing the structure of the polygons. The only way that we can see that is if we disable Edges Only in the Object Properties. With the object selected, right-click, go to Object Properties, and disable Edges Only. Click OK. And now, we can see the internal triangles within each polygon. And that topology will determine how an object responds to any deformer if I wanted to, for example, bend this. So if you're going to apply deformers, then change the Cap Type over to Grid and now, we've got a much better structure there. But we also need to make sure that we have enough detail all the way around on all of these sides. And to do that, we'll have to play around with some of the interpolation settings. So if we go back up to the top and open up Interpolation, we can disable Optimize and now, we've got a lot more detail.

3ds max Spline Modeling Adding a Bevel modifier

3ds max Spline Modeling Adding a Bevel modifier


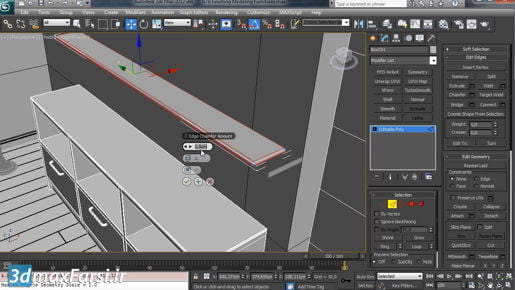
3ds max Spline Modeling Adding a Bevel modifier And then we can select both of those points at that location and weld them. And we can verify that it worked by selecting and moving, and it moved as a unit, whereas this one down here that hasn't been welded yet. If I select just by clicking and dragging, you can see that, in fact, there are two vertices there. I'll undo that, drag a rectangle to select them both, and then weld, and then test it. So that's one thing that you'll want to do is weld nearby vertices. I'll undo that. You may need to add detail as well. It'll be easier for us to see why once we've actually applied the Bevel. So I'll exit out of Sub-Object Vertex, dolly back, I'll just zoom with the Z key. And from the Modifier list, add a Bevel. And let's look at this in a shaded view. So I'll go back out to the forward view ports, Alt + W, and in the perspective view, it's black on the front, and it's actually shaded correctly on the back. We need to adjust a bunch of the parameters down here. So we've got different levels to the Bevel. We have the start outline first, and that is the size of each closed spline. And let's get in close. 

3ds max Spline Modeling Adding a Bevel modifier . Dolly in with Control, Alt, and middle mouse. I can turn the snaps back off again and play around with this start outline. As I increase it, what happens is, the letters get thicker. I'll undo that. If I decrease the start outline, things go wrong. See, it's actually crashing into itself. So I'll set the start outline to zero, and that's probably the best setting for the start outline is actually zero so it's not doing an outline at the very front of that object. Then we have level one, and this is an extrusion. It has a height and an outline. And these values are relative to the level above them. So if I do a height value here, it will extrude either forward or back relative to the start outline position. And I want to actually extrude backwards, so I'll give it a negative value, click and drag. Let's set it to negative 10 centimeters. Now let's take a look at what this outline does. If we click and drag on this level one outline, we can see that we're able to create an angle or chamfer there. All right, pretty neat. Let's say I want to have a straight extrusion, but just a chamfer on the edge. Well, then I would want to enable level two and give that some negative height. And there I got that result that I was seeking. Well, let's change this up a little bit. I'll change these values to make them much lower so that we'll have a small chamfer around that edge. Set the outline to one centimeter, If we want a chamfer on the back, then we can enable level three and give it some non-zero height and outline. I'll extrude backward another centimeter, so negative one centimeter for the height. And now we can see that extrusion. It's got an edge loop there, and the outline also negative one. So what I've done is I've started with an outline of zero at this location here. Then I've given it a positive outline and then no outline, and finally a negative outline. 

3ds max Spline Modeling Adding a Bevel modifier. pretty cool. We can also choose Curved Sides up here. Set this to Curved Sides and increase the segments, and we'll need to change these values. The curved sides do weird things, so you'll have to change these values quite drastically in order to get a good result. And it's not very intuitive. You're just going to have to play with it and try to figure out how to do it best. It's kind of trial and error. All right, well, I'm going to undo all those changes. I'll just right click on my undo, and I've got a bunch of parameter changes. I don't know how far back I'm going to go, but let's say I'll go four steps back and click Undo. All right, I'll keep going back with Control + Z until I'm back at, let's just say we'll choose Linear Sides and we're good. All right, so I've got a height of negative one, outline of one, and for level two, height of negative 10, an outline of zero and for level three, height and outline both negative one, and that's a classic straight chamfer. Now let's look at this in more detail. If I press F4, we can see that we don't really have a lot of detail on this. F4 is edged faces, of course, and I need to actually subdivide this if I ever want to maybe deform this shape. So that's when you would want to go into the Editable Spline and maybe refine it. So let's try that. So I'll go into the Editable Spline, turn on Show End Result, and then go into Segment Mode, and we can see the orange segment superimposed. I can select one of these segments here and then go into the Geometry rollout, scroll down. And we're looking for Divide. It's near the bottom. And if I divide with only one segment, I will add one vertex. So let's add two. So I'll set that value to two and then click Divide, and now I've got two new vertices on the spline, resulting in two new edge loops on that side of the model. Okay, so that's something that you may need to do in order to avoid issues if you're working with deformations. All right, so let's go even a little bit deeper than that. I'll go back up to the Editable Spline. I'll exit out of Segment Mode. Go up to the Bevel, and we have here Cap Type, Morph, and Grid. And we won't be able to see the effectiveness unless we disable Faces Only. 3ds max Spline Modeling Adding a Bevel modifier