دانلود آموزش وی ری Vray با دوبله فارسی تری دی مکس پلاگین maya autocad 3d max revit After Effects sketchup معماری ArchiCAD مدل سه بعدی Lumion آبجکت صحنه آماده به رندر فیلم تکسچر و متریال آماده انیمیشن سازی رندرینگ مدلسازی 3 بعدی بازی سازی marvelous designer Photoshop InDesign illustrator Solidworks
Friday, December 27, 2019
3ds max Polygon Modeling Creating doors
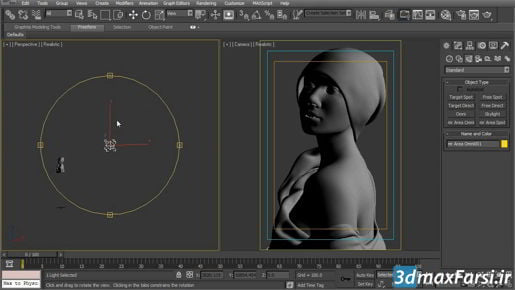
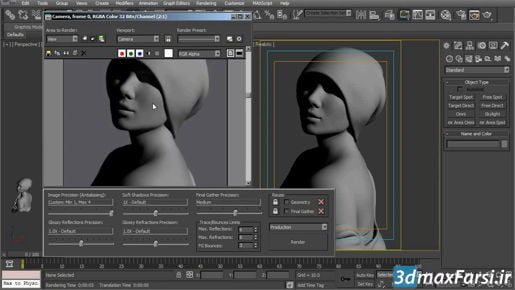
3ds max Polygon Modeling Creating doors We might draw it on some crazy direction, but the rotation will still read zero. And that, in turn, means that we can't effectively fix an incorrect door orientation by changing the rotation value, and that, in turn, means we need to create the door very precisely to begin with. And likewise, if we don't create that door precisely, the length dimension or the width here won't be correct, and the door won't fit into the hole. And in this case, we need to make sure that the Y position of the cursor matches precisely when we make our first two clicks to determine the width of the door. So the Y dimension here needs to equal the Y dimension over here. All right, so let's go now and create our door. Doors are found in the Create panel under Geometry, and from the pull-down list, we can choose Doors. And there are three types, Pivot, Sliding, and Bifold. This will be a pivot door, so we can click on that button. And then as we move the cursor around, we can see the values changing in the transform type in area down here. So move over to one side of the door here, and when the cursor reads out an X value of 600 centimeters and a Y value of 150 centimeters, then click and hold the mouse button down and drag over to the other side, and then watch that readout until the X value equals 600 centimeters and the Y value equals 300 centimeters. Then release the mouse, and we've set the width of the door. Move the cursor without holding the button down, and we're setting the depth of the door. The actual depth amount is not important at this point because we can change it later. But we want to have some non-zero depth amount. Click the mouse button once, and that sets the depth. And once again, without holding the mouse button down, move the cursor, and we can set the height. And again, the actual height doesn't matter at this point because we're going to change it later. So click once again to complete that door, and then right-click to exit door creation. With that door still selected, we can go to the Modify panel and change up its parameters. We already have the correct width of 120 centimeters. Let's set the height to 200 centimeters, and that will fit it precisely within the hole here. And I can orbit around, take a look at the backside here. And the depth parameter is actually quite important because the door itself is offset from the object's pivot point by the depth distance. And I want to set this up so that I can actually rotate the door if I want, or I could use this open parameter here. I can click and drag on that spinner and open the door up procedurally, and we can see that it's swinging in the wrong direction. We can fix that by just enabling the flip swing option there. Okay, if we get in closer, we can see this axis tripod indicating the pivot point of the door primitive, into the correct position, so I'll tumble back around to the front and grab the Move tool. And I can bring that forward using the snaps, and I just want to make sure that it has an X position value of 600 centimeters. Another artistic parameter here is the door panel, and for this modern office, I don't want any door panels. And back in the parameters for that pivot door, I can set the Panels to None. And now, it's essentially a box. But if we rendered this now, we might not even see that there is a door at all because the edges are lining up perfectly. The walls and the door are touching precisely on three sides. And we can help that out and make that door more visible and more realistic by just chamfering the edges of the door. And so that we can see it better, let's turn on Isolate Selection, and then with that door selected, go to the Modify panel and add a Chamfer modifier. And with that chamfer added now, we can see that we're getting rounded edges here. I want some basic chamfered edges rather than these rounded filleted edges. In the Chamfer Options here, we can scroll back up to the top, and we've got Corner Options. Set the Mitering type to Tri or Triangle. And now, I've got some nice chamfered edges rather than filleted or rounded edges. I want to reduce the Chamfer Options amount to 0.3 centimeters, and now, I got a little bit of a chamfer there to catch the light. Very good, we can turn off Isolate Selection. And to help this out even more, we can actually create a gap around the door. Let's make a one millimeter gap all the way around. And to do that, we can go back into the Boolean. The wall east object here is a Boolean, and we did that in a previous movie. Let's just select that door east, and we can see here that we've got a Boolean object with some operands. And to make this very clear what's going on, let's look at this in a orthographic view. Alt + W to go to the four viewport layout. Go over to the left view and right-click in that view, and then Alt + W again to maximize it, and use F3 to go into Shaded mode, and get in really close on that corner so that we're down to a sub-one centimeter value. All right, so there we go. This grid line is one centimeter, and we want to make the box operand a little bit larger. So we can go over here to our operands and select one of these boxes in the operand area, and then it's displayed in the modifier stack as a sub object type. And we can select it there, and we'll get a typology warning, but we're not actually going to be changing the structure or typology here. We're just going to change the dimensions a little bit. So in this case, we're not going to have any adverse effects from this.
3ds max Polygon Modeling Cutting with Boolean subtraction
3ds max Polygon Modeling Cutting with Boolean subtraction Now we need to add the other operands. And in the operand parameters we can see that the currently selected operand, wall east, is of the type union, 'cause that is lit up in blue. And when we need add another operand we need to choose an operand operation over here. So we'll click on add operands, and then click on one of the boxes and its defaulted to a union, which is going to add the volumes together. With box01 selected in the list here, switch that over to subtract and now we've got a nice hole there.
3ds max Polygon Modeling Layering deformers in the modifier stack
3ds max Polygon Modeling Layering deformers in the modifier stack If we scroll down to edit geometry rollout, we'll see Quickslice, and let's do this in the left Viewport, because Quickslice operates in screen space, it's going to chop a series of edges along a plane that is precisely orthogonal to the current Viewport. So, maximize the left Viewport right click in there, and then maximize with Alt + W and then activate the Quickslice tool with three D snaps enabled, and snapping to grid points, and we just want to chop right through along the origin line here, and that's the z-axis. Click and hold the mouse down and then drag out. It actually doesn't matter how long this line is. because the plane that's doing the cutting will extend infinitely in all directions. The only important thing is we're not going at an angle. That's why we have snaps enabled. So, once you've got over where you want it, you can click again, and then that cut has been made. Right click to exit out of the Quickslice tool. Go back to the four Viewport layout with Alt + W, and we've got that edge loop created. All right now that object is legal for a Boolean operation with two holes to be cut.
3ds max Polygon Modeling Creating polygons
3ds max Polygon Modeling Creating polygons And then use the middle mouse button to navigate. Click on one, click on another, and click on the first vertex once again. And a polygon is created there, and it's also selected, meaning that it's going to be displayed in shaded, in a red color by default. And that's controlled with the F2 keyboard shortcut. If I turn F2 off then the selected polygons are not highlighted. Turn that back on with F2. Just repeat that process for the other three polygons here. Maybe I'll switch back to shaded mode. Click on a vertex, click on the second one, and then the third one, the fourth one, and then the first one again. And then that process just one more time over here. One, two, three, four, and one. And that's how to create new polygons based upon existing vertices and open borders.
3ds max Polygon Modeling Using the Modeling ribbon
3ds max Polygon Modeling Using the Modeling ribbon So I'm going to cut using quick slice and again I don't need to be in a sub object mode but I do want to be snapping to gride points so I'll enable 3D snaps. And we have the most common tools here in the edit section and here's quick slice, so just click on that. And I want to get in close here so I can be at centimeter accuracy and as we saw in a previous movie, quick slice will chop through the entire model even if we draw very small line here. So click once to create the first point and I said earlier that you need to hold the mouse down but you don't actually need to hold the mouse down so, don't hold the mouse down. And then click again to create the second point and now we have a new edge loop running through that model. You can see that if we get in close here on the perspective view. Cool, so that edge loops done, we want another one here on the other side of the door so just use the middle mouse to navigate get over there to the other side of this double door. Click to create a point, click to create another point and now we have another edge loop. We need one more edge loop running horizontally so click and click again, and now we've got the topology that we want in order to delete that polygon there to punch a hole. I'm done with quick slice so I can either right click, in the view port to exit out of the quick slice tool or I can just go to a different tool such as move or select object. Alright so, there are many many tools on the ribbon here, and it's your choice whether you want to use the ribbon or the modify panel. I'm going to restore that modify panel cause I might need to get at some of the other elements on the command panel. Once again I can right click on any textured bar in the interface and re-enable display of the command panel. That's a quick introduction to the ribbon
3ds max Polygon Modeling Using the caddy to set options for an inset polygon
3ds max Polygon Modeling Using the caddy to set options for an inset polygon I'll choose inset settings, and the caddy appears in the center of the viewport, but we can click on the little textured horizontal vertical line there and drag that over, and now we can actually see this little bit better. And the inset tool options are displayed. The only thing we really care about is the inset amount, which is here. Let me just type that in. I'll put in a value of 0.3 centimeters. and to see a preview of that, press the Enter key. And now we're seeing the inset polygon, and it's .3 centimeters away from the original polygon. Now, if I press Enter when we don't have focus on this entry field, if I click off of that and then press the Enter key, the action will actually be performed, and that's the same as clicking on the checkbox here. The difference is if I press Enter, then the command is performed and the tool exits. If I click on the OK or checkbox here, it will also perform the command and exit. And there's also a little plus sign here. If we click on that, then the command is performed, and then we will be ready to perform another command of that same type. So if I click on the plus sign here, then I get a kind of weird result, because now what we're seeing is the inset polygon has been created and then the newly-created inset polygon is having another inset applied to it. So at all times when we're looking in the viewport here while the caddy is up, what we're seeing is not the current state of the model. We're actually seeing a preview of what it will look like after this command is performed. That does take a little bit of getting used to, and the only exception to that is if nothing is selected. So if I click out here, nothing is selected, then we seen no preview. If I select some other polygon, now we see an inset polygon there. All right so that's how the caddy works. If you just want to perform the command, then choose OK. If you want to perform the command and then perform subsequent commands of the same type, then press the plus sign. And you want to exit without performing the command, just use the X button here. All right, we've created our inset polygon, and we can exit out of sub object mode. That's how to use the caddy to access the options for tools in editable poly.
3ds max Polygon Modeling Transforming sub-objects
3ds max Polygon Modeling Transforming sub-objects I'll undo that with ctrl+z. A handy feature of 3ds Max is the ability to select edge loops or a series of connected edges by simply double clicking. And if I double click on that same edge, notice in the perspective view, that more than one edge got selected. My selection went around corners. So that's an edge loop. But I actually want to move all of these edges, and I can't actually double click to select them all, because 3ds Max doesn't know which direction to take that selection, because there is a complex topology here, where this edge is actually meeting with one, two, three, four other edges, and it seems obvious and intuitive enough for a human, that we want the edge selection to continue this way, but 3ds Max is not that smart. So, we can do this a different way, we can move all of these edges by moving their vertices. I'll go into vertex sub-object mode, and that allows me to select individual points on the model. I'll click to de-select anything that may have been selected, and then drag a selection rectangle around all the vertices in the middle here.
3ds max Polygon Modeling Transforming sub-objects And now I can move them all up to create a little bit of a gap at the door there. Get in really close with the wheel. My grid is currently set to 1cm increments, and that means I won't be able to use snaps to move this just 1mm, unless I change my grid settings, but I can just actually type in the value I want the selected component to move in. Before I do, I want to choose the coordinate system that I'm going to move them in, and the default coordinate system is view, and that can be a bit confusing, so I'm going to switch that to world. And now all transforms will be in world space. View space, of course, is the 2D plane of the current viewport, or in perspective view, view space is actually world space. So now I'm going to do all my movements in world space for the move tool. And I want to move those selected vertices up in Z by 1mm, and one way to do that is from the Transform Type-In dialog. I like to use this because I can see the absolute and the offset values at once. Right click on the move tool, and we can see the absolute position and the amount of offset we are going to create. I'll get in very very close in that front view, and this is a single centimeter per grid increment. I move it up in Z, or elevation, by 0.1cm. And now that's been moved up by 1mm. Likewise, with the other points here, I want to move these to the left, and these to the right, just to give a 1mm gap for the doors.
Subscribe to:
Comments (Atom)


